
Delicious Salmon Sushi Bake Recipe – A Must-Try!
Delicious Salmon Sushi Bake Recipe – A Must-Try!
Have you ever craved the flavors of your favorite Japanese dish but wanted something quick and easy to make at home? This modern twist on a classic is here to save the day! Combining the convenience of baking with the authentic taste you love, this dish is perfect for anyone looking to impress without spending hours in the kitchen.
Imagine layers of sticky rice, perfectly seasoned seafood, and a drizzle of vibrant sauces—all baked to perfection. It’s no wonder this dish has taken social media by storm, becoming a go-to for family dinners, parties, or even game day snacks. The best part? You don’t need to be a pro to create something this delicious.
Whether you’re hosting friends or simply treating yourself, this recipe is designed to deliver restaurant-quality results with minimal effort. Ready to dive in? Let’s explore how you can bring this flavorful creation to your table.
Key Takeaways
- This dish combines the ease of baking with the authentic flavors of a classic favorite.
- Perfect for home cooks looking for a quick yet impressive meal.
- Layers of sticky rice, seasoned seafood, and vibrant sauces create a mouthwatering experience.
- Ideal for gatherings, family meals, or as a fun appetizer.
- Simple steps and minimal prep make it accessible for everyone.
Introduction to Salmon Sushi Bake
Looking for a dish that’s both comforting and creative? This modern take on a classic combines the familiar flavors of Japanese cuisine with a fun, deconstructed twist. Perfect for busy weeknights or weekend gatherings, it’s designed to deliver bold flavors with minimal effort.
What Makes This Dish Special?
At its core, this dish blends tender seafood with sticky sushi rice, creating a base that’s both hearty and satisfying. The addition of creamy mayo and zesty sriracha adds a rich, balanced flavor that’s hard to resist. A sprinkle of sesame seeds and furikake brings a subtle crunch and umami depth, elevating every bite.
What sets it apart is its simplicity. Unlike traditional recipes that require rolling and precise techniques, this version is baked, making it accessible for home cooks of all skill levels. The layers of rice, seafood, and sauce come together in a way that’s both visually appealing and delicious.
Why You’ll Love It
This dish is perfect for anyone who loves bold, vibrant flavors but doesn’t want to spend hours in the kitchen. The combination of seasoning and high-quality ingredients ensures every bite is packed with taste. Plus, its deconstructed presentation makes it a fun and interactive option for sharing with friends and family.
Whether you’re hosting a party or simply treating yourself, this recipe is a surefire way to impress. It’s a modern interpretation of a classic, blending ease-of-preparation with gourmet results. Ready to dive in? Let’s explore what makes this dish so special.
Key Ingredients and Preparation Techniques
Unlock the art of balancing textures and tastes in every bite. The success of this dish lies in the quality of its ingredients and the precision of its preparation. From the sticky rice to the creamy blend of flavors, each component plays a vital role in creating a harmonious culinary experience.

Essential Components of the Dish
At the heart of this dish is sushi rice, which provides the perfect base. Its sticky texture holds the layers together while absorbing the flavors of the other ingredients. High-quality cream cheese adds a rich creaminess, blending seamlessly with the tangy notes of rice vinegar.
The seafood component, whether fresh or imitation, brings a savory depth. Paired with roasted seaweed, it adds an umami kick that elevates the dish. Each ingredient is carefully selected to ensure a balanced and satisfying bite.
Tips for Preparing Perfect Sushi Rice
Start by rinsing the rice thoroughly to remove excess starch. This step ensures the grains cook evenly and achieve the desired stickiness. Use a bowl to mix the cooked rice with a blend of rice vinegar, sugar, and salt. This seasoning adds a subtle tangy-sweet flavor that complements the other ingredients.
When pressing the rice into the baking dish, use a flat utensil to create an even layer. This technique ensures every bite has the perfect balance of rice and toppings. For added freshness, prepare the rice just before assembling the dish.
| Ingredient | Role | Tips |
|---|---|---|
| Sushi Rice | Base layer | Rinse thoroughly, season with rice vinegar |
| Cream Cheese | Creaminess | Use high-quality for smooth texture |
| Seafood | Savory depth | Choose fresh or high-quality imitation |
| Seaweed | Umami flavor | Roast lightly for enhanced taste |
By focusing on these key elements and techniques, you can create a dish that’s both visually appealing and packed with flavor. Every step, from ingredient selection to preparation, contributes to the final masterpiece.
Step-by-Step Guide to Making a Salmon Sushi Bake Recipe
Ready to create a dish that’s both flavorful and easy to assemble? Follow this detailed guide to bring together layers of sticky rice, tender seafood, and creamy toppings. Each step is designed to ensure your dish turns out perfectly, whether you’re a beginner or a seasoned cook.
Preparing the Rice Layer
Start by cooking the sushi rice. Rinse it thoroughly to remove excess starch, then cook it according to the package instructions. This usually takes about 10 minutes in a rice cooker. Once cooked, season the rice with a blend of rice vinegar, sugar, and a pinch of salt. Mix gently to avoid breaking the grains.
Line your baking dish with parchment paper for easy removal later. Press the seasoned rice firmly into the dish, creating an even layer. This base will hold the other ingredients together and provide a satisfying texture.

Cooking and Shredding the Salmon
Preheat your oven to 400°F. Season the salmon lightly with salt and bake it for about 9 minutes, or until it reaches an internal temperature of 140°F. Let it cool slightly, then carefully remove the skin. Use a fork to shred the salmon into bite-sized pieces.
Combine the shredded salmon with a creamy mixture of mayonnaise, sriracha, and a touch of soy sauce. This blend adds richness and a hint of spice to the dish.
Layering and Assembly Process
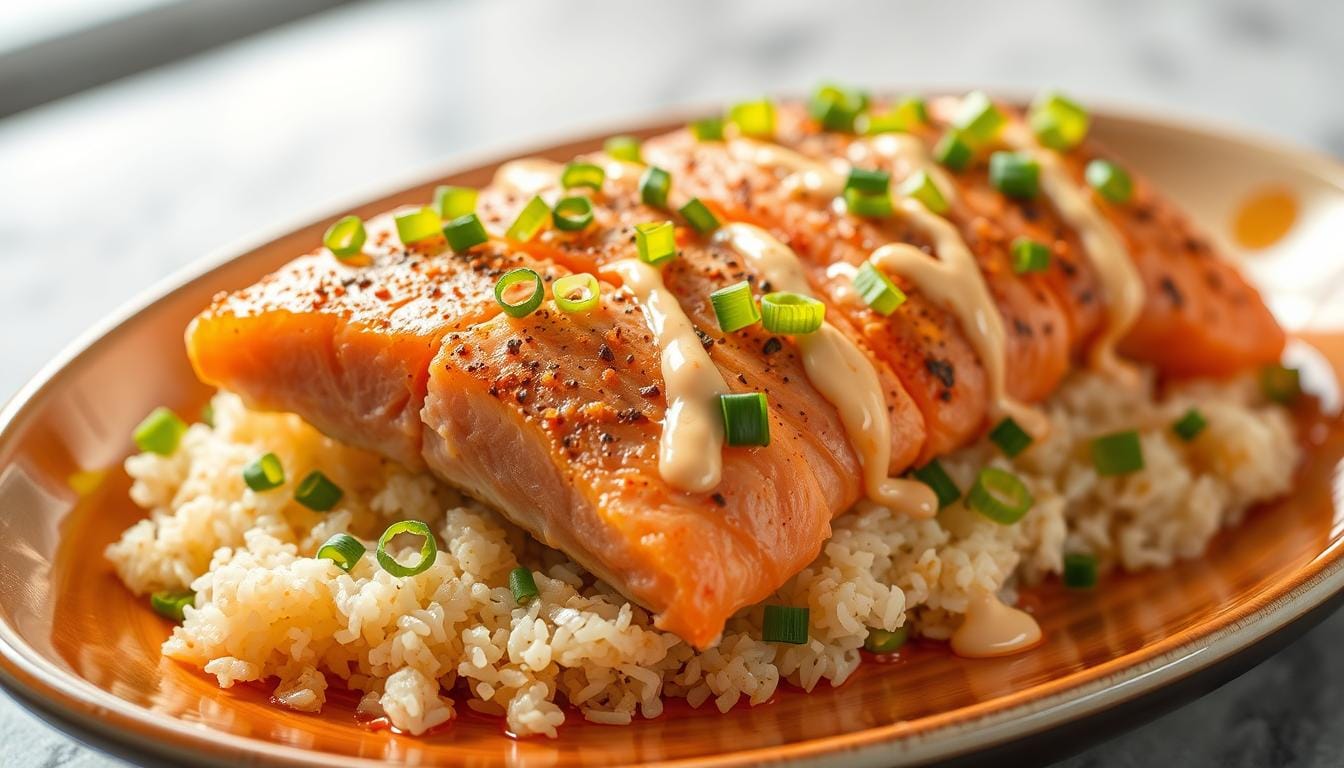
Spread the salmon mixture evenly over the rice layer. Sprinkle furikake or sesame seeds for added flavor and texture. For a finishing touch, drizzle a bit more mayonnaise and sriracha on top.
Bake the dish at 375°F for 10-15 minutes, or until the top is slightly golden and the mixture is heated through. Let it cool for a few minutes before serving. Use a sheet of nori to roll each bite for an authentic experience.
With these steps, you’ll have a dish that’s as visually appealing as it is delicious. Enjoy!
Variations, Toppings, and Serving Ideas
Want to elevate your dish with creative flair? Try these unique topping ideas! Whether you’re hosting a party or enjoying a quiet meal, these variations will add excitement to every bite. Let’s explore how you can personalize your dish to suit your taste.
Unique Twists to Personalize Your Dish
Adding your own twist is easier than you think. Drizzle complementary sauces like eel sauce or spicy mayo on top for extra flavor. For a crunchy texture, sprinkle furikake generously. This Japanese seasoning adds an umami boost that pairs perfectly with the dish.
If you love creamy textures, add slices of avocado. Their richness balances the savory flavors. For a hint of heat, mix in extra sriracha to the mayo. These small changes can transform the dish into something uniquely yours.
Creative Garnish Options
Garnishes are the finishing touch that makes your dish visually appealing. Sprinkle sesame seeds for a subtle crunch. Add sliced scallions or jalapeños for a fresh, vibrant look. These garnishes not only enhance the flavor but also make the dish Instagram-worthy.
Experiment with different combinations to find your favorite. Whether it’s a drizzle of sauce or a sprinkle of seeds, these toppings can make your dish stand out.
| Topping | Flavor Profile | Best Pairing |
|---|---|---|
| Furikake | Umami, Crunchy | Rice Layer |
| Avocado | Creamy, Fresh | Salmon Mixture |
| Sriracha Mayo | Spicy, Tangy | Top Layer |
| Sesame Seeds | Nutty, Crunchy | Garnish |
With these ideas, you can create a dish that’s not only delicious but also tailored to your preferences. Enjoy experimenting and discovering new flavor combinations!
Nutritional Benefits and Cooking Tips
Discover how this dish not only satisfies your taste buds but also offers a range of health benefits. Packed with nutrient-rich ingredients, it’s a meal that’s as good for your body as it is delicious. Plus, with a few smart tips, you can enjoy it for days without losing its flavor or texture.
Health Benefits of Using Omega-3 Rich Ingredients
The star of this dish is its main protein, which is loaded with heart-healthy omega-3 fats. These essential nutrients support brain function, reduce inflammation, and promote cardiovascular health. When you make sushi at home, baking the protein ensures it’s cooked safely while retaining its nutritional value.
Omega-3s are also known to improve skin health and boost mood. Pairing this protein with sticky rice and fresh garnishes creates a balanced meal that’s both satisfying and nourishing. It’s a great way to enjoy a flavorful dish while staying mindful of your health.
Best Practices for Leftovers and Storage
If you have leftovers, store them in an airtight container to maintain freshness. This dish stays delicious for up to a day or two in the fridge. For longer storage, consider freezing portions in individual servings.
When reheating, use an oven or toaster oven at 350°F for 10-15 minutes. This method helps maintain the dish’s texture and flavor. Avoid microwaving, as it can make the rice soggy and unevenly heat the protein.
| Storage Method | Duration | Reheating Tips |
|---|---|---|
| Refrigerator | 1-2 days | Reheat at 350°F for 10-15 minutes |
| Freezer | Up to 1 month | Thaw overnight, then reheat as above |
By following these tips, you can enjoy this dish at its best, whether it’s fresh or reheated. It’s a versatile meal that’s perfect for any day of the week.
Conclusion
Bringing together traditional flavors with a modern twist, this dish is a game-changer for your dinner table. Its layers of sticky rice, creamy cheese, and zesty sauces create a harmonious blend that’s both comforting and exciting. The ease of preparation, especially using your oven, makes it a go-to for busy weeknights or gatherings.
Experiment with a drizzle of vinegar or a dollop of cream to add your personal touch. Whether you’re hosting or treating yourself, this dish is sure to impress. Don’t forget to leave a review after trying it—your feedback can inspire others to explore this flavorful creation.
With the right techniques and a bit of creativity, your next meal will be a delicious success. Share your results and tips with the online community to spread the joy of this versatile dish. Enjoy!
FAQ
Can I use other types of seafood for this dish?
How do I store leftovers?
What can I use instead of furikake?
Can I make this dish ahead of time?
Is there a dairy-free alternative for cream cheese?
How can I make the dish spicier?
Can I use brown rice instead of sushi rice?
What are some creative toppings I can add?
There are no reviews yet. Be the first one to write one.